
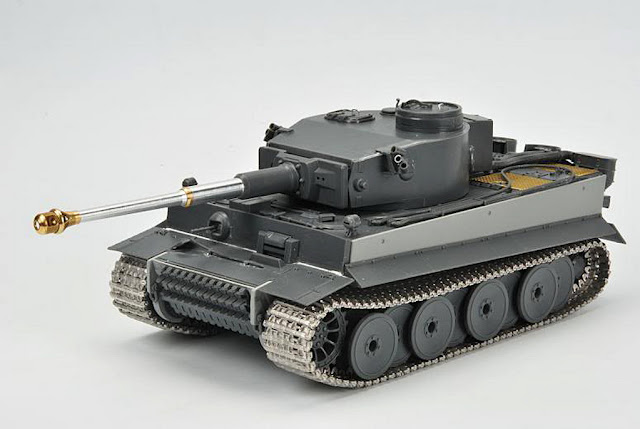
Hi everyone, Jose Luis Lopez is one of those innovative modellers I love. In this article he explains with a complete step by step his Black&White
painting technique. Whith this technique you can get a perfect and awesome lighting effect and also allows us to check the main painting effects and retouch them before applying the colour with a quite transparent coat. In short, it is like a really advanced pre-shading. JL also used this technique in the
1/35 T-55 Enigma that you can find in the Guest Gallery or clicking here.
Q

PREPARING THE BASE TO WORK.
When you´re painting a kit, all the steps are important. So, I can´t say that these three first steps are the most important. but, for many modellers, the bad results painting with the airbrush starts here.

Picture 1: In this step, you can see Gunze´s Metal primer. I always apply this primer with a brush over the metal surfaces. Gun barrel, PE parts. All metal parts are covered with a thick, really thick coat of this product. This will protect the metal parts from aggressive painting thinners and avoid the paint to peel off.

Picture 2: Once Gunze´s primer is dry, I apply with an airbrush Tamiya´s surface primer. This is the first time I use the white primer and I must say that it´s more difficult to apply than the grey one. Very important: an airbrush is not a brush. You do not have to cover a surface the first time you paint over it. No, no, no, do it in several fine coats, the price is to achieve a nice surface, not finish the first! I´ll insist a lot about this. The airbrush is you friend, he can really make you life easier! Just use it in the correct way.

Picture 3: One of the most desperate moments for the modeller is when he discovers than the paint over the kit is granulated. People use to hate this, and therefore, the airbrush. There are several variables that help the enemy to granulate your kit surfaces, lack of moisture in the air, too much dust in the environment, bad paint, bad airbrush but even in the worst situation, you have a great ally: a fine sand paper. Use it when necessary over granulated surfaces (be careful with PE parts!), and, very important, the surface must be soft and clean as the skin of a baby! Of course, if you´re making a big tank with rough surfaces no matter, but a smooth surface prior painting is start playing with advantage!

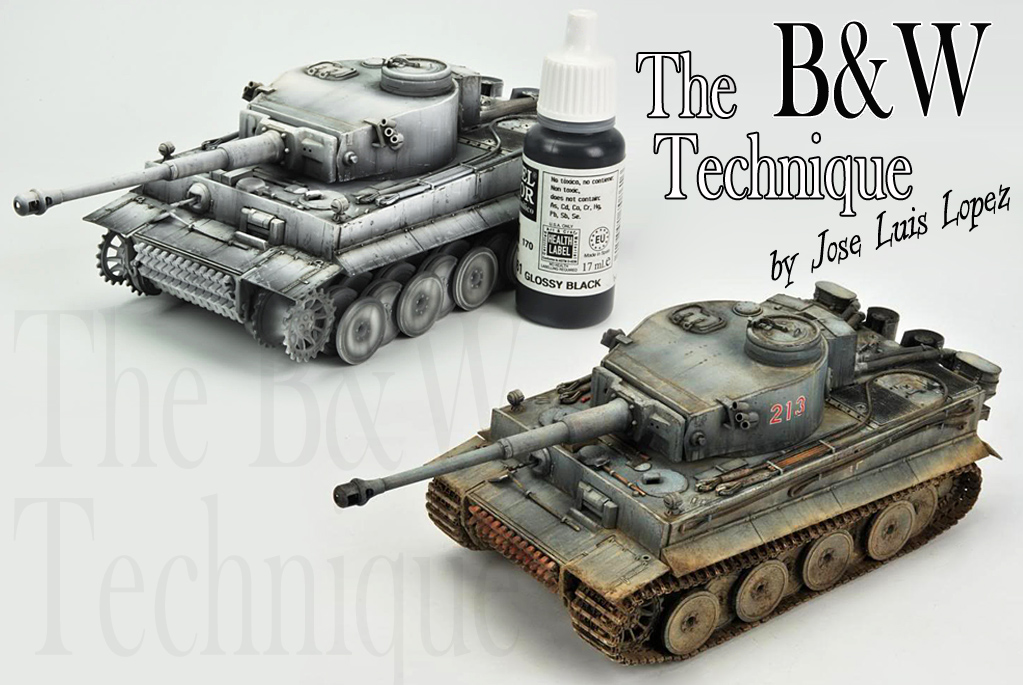
Now, we have to start preparing our Tiger´s skin. Here starts the challenge. Why this technique? In my case, because I have no a clear idea about colour theory! Most of times, when I want to lighten or darken a colour (dark yellow, for example), the results are anything but harmonics. So, I´ll make the zenithal or modulation effects with a black-grey-white series with no chance of mistake as I just will use black and white colour. Of course, actually you can find a lot of colour sets that makes you life easier (AK Interactive, Lifecolor) and I strongly recommend them. But as I use to customize a lot my base colours and I´m a little bit poor ( :^(), I´ve invented (¿¿??) this technique to achieve similar effects just with black and white paint (and the base colour). Hope you like it!!
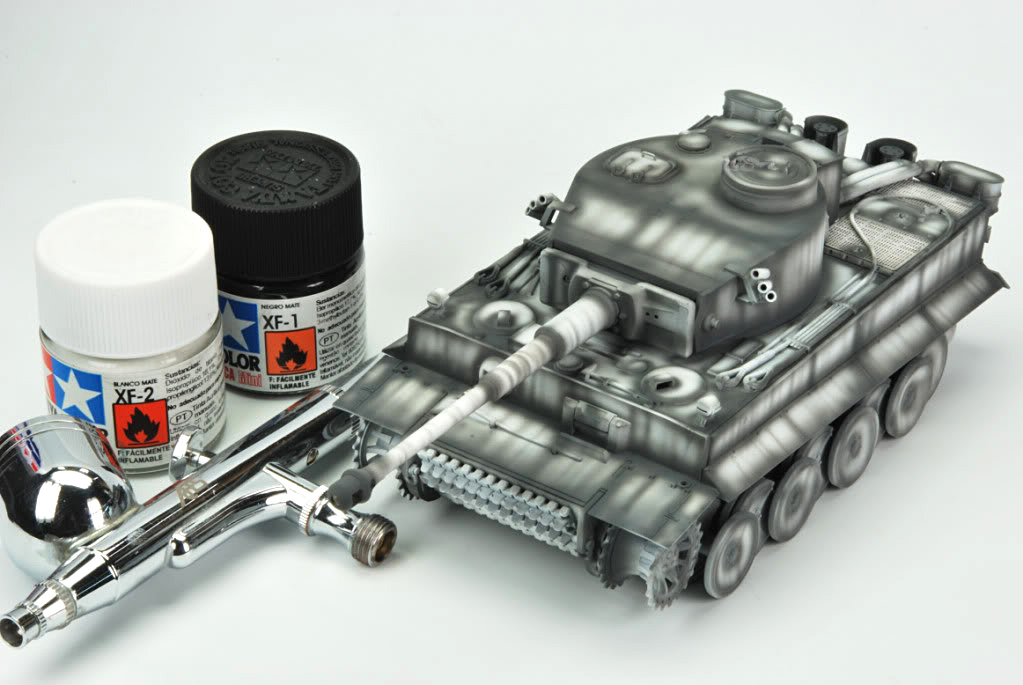
Picture 4: General preshading. For me is an important step as I help to start visualizing the final result. I can discover light effects, have a preliminary idea about the weathering and the most attractive parts of the kit (for painting). With this B&W technique not too much of this step will be seen later (just a little bit, enough to keep the future general looking). I used a 90% black 10% mix applied with my airbrush, using Tamiya acrylic paint thinned with Lacquer Thinner. I´ll repeat this hundred times use your airbrush not like a brush. To pass over a surface do not implies the surface is painted. It´ll be painted may be the 6-710 time you pass over it.

Picture 5: Using first a 80% white and 20% black, I started to paint the general colour of my B&W base, As usually, the paint is heavily thinned as I also want that the preshading work can be seen under this general base colour. Adding each time more white to the mix, I start to play with the modulation and zenithal lights over the vehicle. The last step is made using pure white paint. Yes, I know, some skills with airbrush are required, but this preliminary base is a great choice to start taking confidence with one of your best weapons!. Always remember, an airbrush is not a brush. Always thinned paint, move quickly but with precision (the same precision you use to make incredible PE detailing work!). Always try on a piece of paper before painting your model. A nice base coat, even without any kind of modulation or highlights, always takes 2 or 3 sessions. In the first session, the paint should be barely visible. Do it always little by little. Due to high temperatures here in Madrid and the dry environment, I´ve problems painting. Even with care, sometimes the paint arrives dry to the surfaces but remember, your friend the sandpaper is always there, supporting you!

Picture 6: Using pure white acrylic paint from Vallejo, with a brush, I just painted some details here and there (clasp, rivets, edges). I played with the number of coats of paint (one is never enough, like with airbrush) so, not all the details have the same white intensity. I always look for very rich bases, with several colour shades. The result by now looks strange, even the pictures seems rare (the white background does not help!), but now we have the perfect base for chipping and weathering!

Picture 7: Now, time for chipping. For many modellers, a real nightmare. Actually, it´s a really difficult step, not only making them in the right shape, but also locating them in the correct an reasonable places. And it´s also a tedious work and frustrating at times And many, many, many times, a good painted kit is spoiled by a bad chipping work. And there´s no second chance with chippings, unfortunately.
And another important factor: How many kits we make in a year? As the average modeller makes 2-3 kits per year, our hands are not always trained to make chipping and scratches. So, when we´re making our chipping work, it was more than 4-5 months the last time we made them. So, we have no habit, no pulse and the first chips are awful? Just when we have been for a pair of hours making chips they start to look nice, just in the moment the work is finished!!. And most times, there are too much chips, or are wrongly situated, or are poorly done. Time to cry. But with this technique, you have two chances, In the first, now, let your hand get warm, do the chips without fear, with confidence, dare to risk with some of them, and, most of all, once you finish this step, stop. Stop. Stop. Look at your kit, investigate it, localize the nice chips, think about the finished tank. And think about keeping the right ones, the places where some are missing, or the places where none is necessary and you´ve already paint several chips. All these are not real problems, as when we paint the base colour we can hide or enhance them at our will.
But, most important once finished this step. Your hand is ready for painting the final chips and you now know where are they wrong and where are nice. You have a second chance later.
I used Vallejo paints for this step, using pure white for some chips and a light grey for the chips located at the darker parts of the Tiger.

Picture 8: General washes all over the tank. I used for this task Panel Line Accent Color from Tamiya, a great product that can be mixed with any of Tamiya´s enamel range and can be thinned with Tamiya´s thinner (blue cap). Previously, I added an generous and thick coat of Tamiya´s clear with my airbrush, a completely necessary base for washes and weathering with this technique.
Also an important step. Here, all the details will become to live, and, something else, a completely no removed wash over a plane surface is a kind of weathering after all!, By now, you´ll probably locate very attractive parts of your kit, which now is far from looking a toy. In 1/48 scale, this step is especially relevant due to the lack of detail of these kits comparing them with their 1/35 counterparts.

Picture 9: Another view of the Tiger with washes.

Picture 10: Time for weathering. Not a real weathering but a kind of weathering that will help you to create a surface full of contrasts and nice looking for the future base colour. Like on chipping task, you have now the perfect choice to risk and dare with the effects in this step. Start thinking about the finished tank and start looking for attractive weathering and colour effects here and there. And do not do it under pressure, just enjoy playing with your brush. Improve your skills no matter if you fails!
For this task I used Vallejo Glossy Black, which suits perfectly to this task. The procedure is simply. Make a spot, a mark, a dirty surface with the paint slightly thinned with water. Do not worry, do it in a rude or exquisite way, but do it and experiment yourself with the shape of the spots and rain marks or any kind of effect you want.

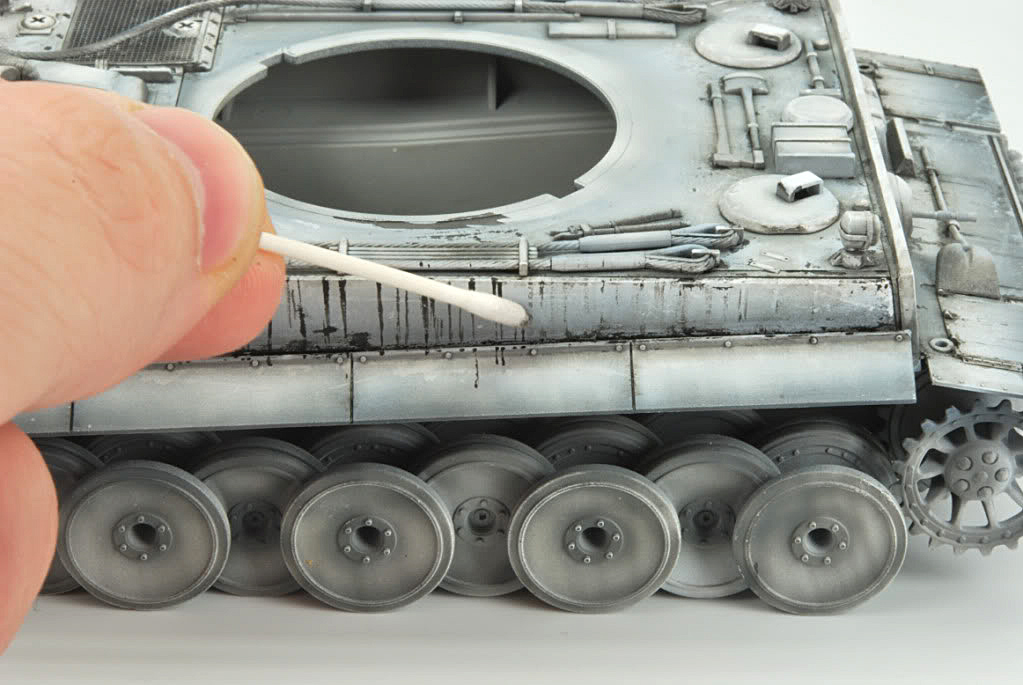
Picture 11: Once the glossy black paint is dry (5-10 minutes or even less), with a cotton stick, start removing the paint like if you´re using an pencil, drawing the final shape of the weathering all around the kit. And, once again, you´re working without pressure because if the spots made in the previous step were horrible and without sense, you can erase then partial or completely at your will. You can be extreme painting several dirt spots, and then, calmly, always thinking about the finished tank, erase or modify them to the best way.

Picture 12: The finished step. And, again, think about the actual result and the way you want to finish the tank. You have time to change, modify and improve anything you want. And, once again (apologizes if I´m repeating too much), work without pressure during these steps, preparing your hands for the following more demanding steps do you feel your hand warm and ready? Great!

Next step, painting the base color!
Q
PREPARING THE BASE TO WORK.
When you´re painting a kit, all the steps are important. So, I can´t say that these three first steps are the most important. but, for many modellers, the bad results painting with the airbrush starts here.


Picture 1: In this step, you can see Gunze´s Metal primer. I always apply this primer with a brush over the metal surfaces. Gun barrel, PE parts. All metal parts are covered with a thick, really thick coat of this product. This will protect the metal parts from aggressive painting thinners and avoid the paint to peel off.

Picture 2: Once Gunze´s primer is dry, I apply with an airbrush Tamiya´s surface primer. This is the first time I use the white primer and I must say that it´s more difficult to apply than the grey one. Very important: an airbrush is not a brush. You do not have to cover a surface the first time you paint over it. No, no, no, do it in several fine coats, the price is to achieve a nice surface, not finish the first! I´ll insist a lot about this. The airbrush is you friend, he can really make you life easier! Just use it in the correct way.

Picture 3: One of the most desperate moments for the modeller is when he discovers than the paint over the kit is granulated. People use to hate this, and therefore, the airbrush. There are several variables that help the enemy to granulate your kit surfaces, lack of moisture in the air, too much dust in the environment, bad paint, bad airbrush but even in the worst situation, you have a great ally: a fine sand paper. Use it when necessary over granulated surfaces (be careful with PE parts!), and, very important, the surface must be soft and clean as the skin of a baby! Of course, if you´re making a big tank with rough surfaces no matter, but a smooth surface prior painting is start playing with advantage!

Now, we have to start preparing our Tiger´s skin. Here starts the challenge. Why this technique? In my case, because I have no a clear idea about colour theory! Most of times, when I want to lighten or darken a colour (dark yellow, for example), the results are anything but harmonics. So, I´ll make the zenithal or modulation effects with a black-grey-white series with no chance of mistake as I just will use black and white colour. Of course, actually you can find a lot of colour sets that makes you life easier (AK Interactive, Lifecolor) and I strongly recommend them. But as I use to customize a lot my base colours and I´m a little bit poor ( :^(), I´ve invented (¿¿??) this technique to achieve similar effects just with black and white paint (and the base colour). Hope you like it!!
Picture 4: General preshading. For me is an important step as I help to start visualizing the final result. I can discover light effects, have a preliminary idea about the weathering and the most attractive parts of the kit (for painting). With this B&W technique not too much of this step will be seen later (just a little bit, enough to keep the future general looking). I used a 90% black 10% mix applied with my airbrush, using Tamiya acrylic paint thinned with Lacquer Thinner. I´ll repeat this hundred times use your airbrush not like a brush. To pass over a surface do not implies the surface is painted. It´ll be painted may be the 6-710 time you pass over it.
Picture 5: Using first a 80% white and 20% black, I started to paint the general colour of my B&W base, As usually, the paint is heavily thinned as I also want that the preshading work can be seen under this general base colour. Adding each time more white to the mix, I start to play with the modulation and zenithal lights over the vehicle. The last step is made using pure white paint. Yes, I know, some skills with airbrush are required, but this preliminary base is a great choice to start taking confidence with one of your best weapons!. Always remember, an airbrush is not a brush. Always thinned paint, move quickly but with precision (the same precision you use to make incredible PE detailing work!). Always try on a piece of paper before painting your model. A nice base coat, even without any kind of modulation or highlights, always takes 2 or 3 sessions. In the first session, the paint should be barely visible. Do it always little by little. Due to high temperatures here in Madrid and the dry environment, I´ve problems painting. Even with care, sometimes the paint arrives dry to the surfaces but remember, your friend the sandpaper is always there, supporting you!

Picture 6: Using pure white acrylic paint from Vallejo, with a brush, I just painted some details here and there (clasp, rivets, edges). I played with the number of coats of paint (one is never enough, like with airbrush) so, not all the details have the same white intensity. I always look for very rich bases, with several colour shades. The result by now looks strange, even the pictures seems rare (the white background does not help!), but now we have the perfect base for chipping and weathering!

Picture 7: Now, time for chipping. For many modellers, a real nightmare. Actually, it´s a really difficult step, not only making them in the right shape, but also locating them in the correct an reasonable places. And it´s also a tedious work and frustrating at times And many, many, many times, a good painted kit is spoiled by a bad chipping work. And there´s no second chance with chippings, unfortunately.
And another important factor: How many kits we make in a year? As the average modeller makes 2-3 kits per year, our hands are not always trained to make chipping and scratches. So, when we´re making our chipping work, it was more than 4-5 months the last time we made them. So, we have no habit, no pulse and the first chips are awful? Just when we have been for a pair of hours making chips they start to look nice, just in the moment the work is finished!!. And most times, there are too much chips, or are wrongly situated, or are poorly done. Time to cry. But with this technique, you have two chances, In the first, now, let your hand get warm, do the chips without fear, with confidence, dare to risk with some of them, and, most of all, once you finish this step, stop. Stop. Stop. Look at your kit, investigate it, localize the nice chips, think about the finished tank. And think about keeping the right ones, the places where some are missing, or the places where none is necessary and you´ve already paint several chips. All these are not real problems, as when we paint the base colour we can hide or enhance them at our will.
But, most important once finished this step. Your hand is ready for painting the final chips and you now know where are they wrong and where are nice. You have a second chance later.
I used Vallejo paints for this step, using pure white for some chips and a light grey for the chips located at the darker parts of the Tiger.

Picture 8: General washes all over the tank. I used for this task Panel Line Accent Color from Tamiya, a great product that can be mixed with any of Tamiya´s enamel range and can be thinned with Tamiya´s thinner (blue cap). Previously, I added an generous and thick coat of Tamiya´s clear with my airbrush, a completely necessary base for washes and weathering with this technique.
Also an important step. Here, all the details will become to live, and, something else, a completely no removed wash over a plane surface is a kind of weathering after all!, By now, you´ll probably locate very attractive parts of your kit, which now is far from looking a toy. In 1/48 scale, this step is especially relevant due to the lack of detail of these kits comparing them with their 1/35 counterparts.

Picture 9: Another view of the Tiger with washes.

Picture 10: Time for weathering. Not a real weathering but a kind of weathering that will help you to create a surface full of contrasts and nice looking for the future base colour. Like on chipping task, you have now the perfect choice to risk and dare with the effects in this step. Start thinking about the finished tank and start looking for attractive weathering and colour effects here and there. And do not do it under pressure, just enjoy playing with your brush. Improve your skills no matter if you fails!
For this task I used Vallejo Glossy Black, which suits perfectly to this task. The procedure is simply. Make a spot, a mark, a dirty surface with the paint slightly thinned with water. Do not worry, do it in a rude or exquisite way, but do it and experiment yourself with the shape of the spots and rain marks or any kind of effect you want.

Picture 11: Once the glossy black paint is dry (5-10 minutes or even less), with a cotton stick, start removing the paint like if you´re using an pencil, drawing the final shape of the weathering all around the kit. And, once again, you´re working without pressure because if the spots made in the previous step were horrible and without sense, you can erase then partial or completely at your will. You can be extreme painting several dirt spots, and then, calmly, always thinking about the finished tank, erase or modify them to the best way.
Picture 12: The finished step. And, again, think about the actual result and the way you want to finish the tank. You have time to change, modify and improve anything you want. And, once again (apologizes if I´m repeating too much), work without pressure during these steps, preparing your hands for the following more demanding steps do you feel your hand warm and ready? Great!

Next step, painting the base color!
This is very uplifting and informative! Sorry to appear obtuse, but (in Picture 11) what medium is used to modify/remove the Glossy Black, since it is acrylic? Or is it simply erased with the dry cotton tip?
ReplyDeleteThank you for this richly enlightening article; I am looking forward to Part 2!
Nice question.
ReplyDeleteRemember that the surface of the tank is quite smooth (Jose Luis uses fine sandpaper to polish the surface but I prefer using satin or glossy paints for the B&W base, this leaves a smooth surface). What he calls a cotton stick is actually a sort of artist smudge stick (blending stump or tortillon) that is more rigid than a cotton bud. With this tool and the smooth surface of the model is not difficult to scrape the acrylic glossy black paint, especially if it has been diluted in water before painting and you don´t wait too much after applying it. This is not an oil blending; at this stage the result must look coarse because all the effects will be blended when applying the base colour layers.
You can also use a short hair brush or other suitable tool instead of the smudge stick, or you can wet the smudger to help erasing the glossy black, or try any other thing that comes to your mind. The great thing about this B&W pre-painting is that you can experiment without fear to ruin the paint. And when you are satisfied with the look you can go on to the next stage.
Many thanks for your response!
ReplyDeleteI am hoping to make an Armor subject for the first time before too long (a 1/72 T-90), so this technique will be extremely useful.
Hello
ReplyDeleteI have a question(quite late, I know) - Why do you use Vallejo Glossy Black, Matt black does not fit here?
Hi Alex,
DeleteJose Luis uses acrylic glossy black because it dries slower and it has a smother finish than the flat black, that factors are important for the kind of weathering effect he wants in this model. But you can use flat or satin black to get a different effect.
I am really very agree with your qualities it is very helpful for look like home. Thanks so much for info and keep it up.
ReplyDeleteairless paint sprayer
Очень интересная техника прешейдинга. На следующей своей работе попробую повторить. Благодарю за статью. С уважением, Владимир.
ReplyDeleteAmazing tutorial.
ReplyDeleteWow what a great blog, i really enjoyed reading this, good luck in your work. Airbrush Portrait Techniques
ReplyDelete